Showing posts with label FMQ Project. Show all posts
Showing posts with label FMQ Project. Show all posts
Finished Eying the Line
FMQ or Eyeing the Line
I'm quilting again. Got my mystery quilt fixed.


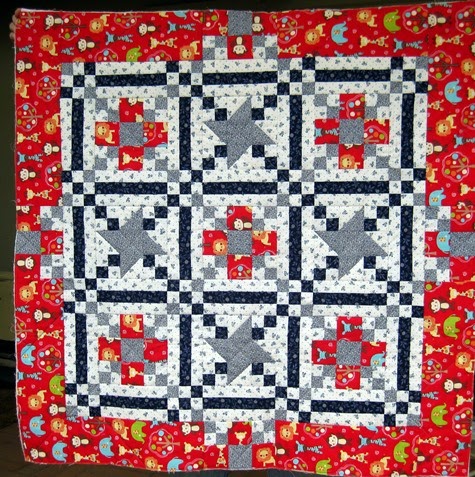
I had washed the flannel back after I had cut it down (bad girl) and it shrunk on two sides. Since I was doing this QAYG, I didn't notice till I had three rows on (the batting was bigger so I couldn't judge by that). So I added a pink border all around it to make the back big enough. Here's what the front looks like:
While I did assemble this using QAYG and row by row - I didn't quilt a lot of it because, surprise! - I can now more easily quilt a 42" top. I'm making progress! Because this had so many strong diagonal lines, I decided to quilt it on those lines. The top picture shows my first line - a diagonal from corner to corner.
I call this eyeing the line because I'm not going to mark the lines with Frixon pen or chalk lines. I'm going to eye the line ahead of the needle to the next small block. Even though I'm using my walking foot, I'm guiding it, so to me it's sort of like free motion. I wouldn't have been able to do this if I hadn't watched Leah's video on straight line (or SITD) quilting. To me that is still harder than stippling or a meander. Hope you got a chance to quilt today! I'm linking to Leah's Free Motion Project on Friday and Sarah's Can I get a Whoop Whoop. Congrats, Leah, on your finish, and to Sarah for getting her longarm back running.
Hexie Weekend and more.
 Lots to share with you, but first, Help! Look at this black and white copy of a hexie piece. Is it my imagination or what? The hexies seem to blend together. Is it the that they are the same value? If you agree with me, what should I do about it? It's already sewn. I was thinking maybe outlining each flower with dark green embroidery thread in a blanket stitch to make them stand out. Any suggestions greatly appreciated. And here's what it looks like in color. My eye may be deceiving me or the camera emphasized the flowers. ?? Just not happy with it in real life. This piece was given to me by a friend who knows I love hexies. They are one inch hexies.
Next I have finished my first UFO for 2014 - completely done. This top was put together in 1997. It's about 35" square and is my first charity quilt for the year, too.


Oh, and a giveaway starts Saturday, so come on back then for a chance at a $25 certificate from FQS on my Grow your Blog post. See you then!
FMQ Finish
I'm happy to report I've finished quilting my first charity quilt for 2014.
The border pattern is a Mary Covey continuous line pattern. It took me a while to figure out how to use it. Once I realized the flowers had to meet in the middle of the borders, I could get started. Generally, I'm happy with it and glad of the chance to practice my FMQ. I'm linking at Amanda Jean's Finish it Up Friday and Leah's FMQ Project linky.
 |
| This was a UFO from 1997 that I dredged out of the closet and giving to St. Anne's. This would be finished but I found the fabric I want to use for the binding runs. Sooooo.... |
 |
| The back is flannel and it was a dream to quilt. |
 |
| I did the flowers by FMQ and you can see I had a sizing issue. |
A Finish it Up Friday Finish with hexies and FMQ
Went Christmas shopping today. Sigh - didn't find any of the advertised items I went to get. Should have gone at 7 AM this morning, but it was too cold! So back now, rested and here's my finish for this week that I showed you the beginnings of earlier:


I'm linking to Crazy Mom's Finish it Up Friday, Leah's FMQ project. Do visit!

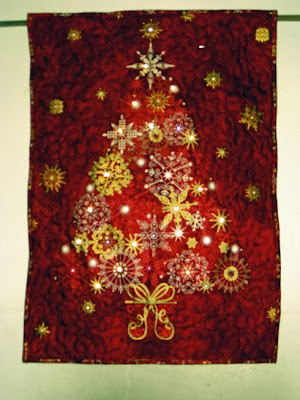
It's a starry night panel from Northcott. I bought a kit from 1000 Bolts. It came with everything. This photo is the truest one to the color of the fabric.

It's hanging over our fireplace. This will be our tree this year.

I FMQued around the tree part and then meandered on the rest of the panel. You can see the puffy parts in this view created by those meanders. And the lights are on. I like how the crystals sparkle.

Actually when the lights are on, the above is what it really looks like. The lights are too bright! Actually you see even less of the fabric than you see here. I'm thinking of looking for a more dim set of lights or adding crystals or rhinestones where the lights are.
Another finish (though small) is the next Hexie flower. Got the first row done.

It's sitting on the rag rug I showed you on Monday. Have three rows done!
How are you doing on your hexie project. Would sure like to see it or any other eye candy. Linky below.
I'm linking to Crazy Mom's Finish it Up Friday, Leah's FMQ project. Do visit!
A Finish of Sorts = FMQ!
It came to me yesterday what a lot of prep there is to getting a top ready for quilting. You ready the top and back making sure they are squared up (sort of), then you get the batting, find your pins and see if your basting space is clear to use. I usually use the carpet in my guest bedroom, but I'm getting less agile at getting down on the floor to do this. My dining table's edge is not conducive to using for sandwiching using clips, and I didn't want to use tape. So after tea and a cookie or two, I had a eureka moment:
 Out from long storage from my sewing clothes day, I pulled out my cardboard cutting board!
 Partially opened it on my kitchen table and it was more than enough for this quilt top.

I laid out the three layers and started to pin the back to the board. This cutting board is constructed of two pieces with an air space in between. If I push the pins into the space, I anchor the quilt and don't scratch my table. I pin a top edge and a side edge. Then I start pinning the opposites by pulling the backing lightly taut as I pin. each of the remaining sides. Then I pin baste the top to the two other layers. Once that's done, and I check the back for no wrinkles, I make a small sandwich and check my machine settings and which thread to use for the quilting.

Phew! Ready at last. I'm off to quilt as soon as I finish the post. I'm linking to Leah's FMQ Project and Amanda Jean's Finish it Up Friday because this quilt will be finished by the end of the day.
Another Finish on Friday
My first landscape. My friend, Bette, invited me to work along with her as she worked through a landscape quilt book. She's such a good teacher! Here is my landscape. I love it! It measures about 14 by 20" I need to add a hanging sleeve and then I'll hang it somewhere in the house where I can see it every day.
 Will have to do another one - maybe Tuscany - will help me dream of one of the places I'd like to visit.
I'm linking over at Crazy Mom's Finish it Up Friday. Lots of eye candy there.

I'm linking over at Crazy Mom's Finish it Up Friday. Lots of eye candy there.
FMQ on Friday
I finished my placemat/table topper with some free motion quilting:
 I used Leah's brick like design for the patio floor and just doodled or stitched in the ditch for the rest. It was fun. Here is the front:


I'm calling it Red in the Garden. The lady block is this month's swap block at Block Lotto. I always wanted red hair. Go figure. Linking up to Leah's FMQ project. You can see lots of great FMQ there.
Hexie Friday and FMQ
Some hexie progress made during my long weekend with the Grands. At least I finished the inner circle of hexies.
 It's suppose to be hot this week, so I might get a lot more done as I sit in the living room staying cool.
And I've been doing some FMQ on that mod Flower Baskets charity quilt. I sort of followed the design of the basket insides, but decided I wanted to do something different than meandering around the baskets. I have this phobia of marking my quilt tops, so I came up with a geometric template that I cut out of freezer paper. A little more time consuming - have to stop after stitching each one and move the pattern to the next intersection. It is doable as I am using my home sewing machine.

I then iron it in place on the quilt top and stitch around the freezer paper.

It is HARD doing those lines - just as I find SITD hard, too. It got better with each one.
Here's how it looks after stitching - not perfect but a way lot better if I didn't use the paper:
 So that's my hexies and FMQ for today. What are you up to? Would love to see your hexies or other project progress, too! Linky below.
I'm linking also to Billie's Hexie Friday post, Amanda Jean's Finish it Friday and Leah's FMQ Friday. Visit and see more luscious eye candy.

And I've been doing some FMQ on that mod Flower Baskets charity quilt. I sort of followed the design of the basket insides, but decided I wanted to do something different than meandering around the baskets. I have this phobia of marking my quilt tops, so I came up with a geometric template that I cut out of freezer paper. A little more time consuming - have to stop after stitching each one and move the pattern to the next intersection. It is doable as I am using my home sewing machine.

I then iron it in place on the quilt top and stitch around the freezer paper.

It is HARD doing those lines - just as I find SITD hard, too. It got better with each one.
Here's how it looks after stitching - not perfect but a way lot better if I didn't use the paper:

I'm linking also to Billie's Hexie Friday post, Amanda Jean's Finish it Friday and Leah's FMQ Friday. Visit and see more luscious eye candy.
Fabric Tuesday Wow
I've been working on quilting 20 squares in a 72 x 90 quilt for my daughter in law since January. Participating in the 2012 FMQ Challenge and the FMQ Project has given me the patterns to use in the square. Well, DDIL's birthday has come around and I finished it , handed it off to my Mom, she bound it and we gave it to her last Sunday. This is the biggest quilt I've quilted on my domestic sewing machine.

Thank you Leah Day, Becky Goldsmith and others for the inspiration to try this.
I'm linking to the FMQ Project, the 2012 FMQ Challenge, Connie's FreeMotionby the River, and Esther's WOW. Go see all the goodies there.

 |
| Close-up of quilted squares |
Thank you Leah Day, Becky Goldsmith and others for the inspiration to try this.
I'm linking to the FMQ Project, the 2012 FMQ Challenge, Connie's FreeMotionby the River, and Esther's WOW. Go see all the goodies there.
FMQ Challenge/Project

I'm behind!
I'm behind on some of my projects, but I bet I'm not the only one. One of the factors in getting there, is what Life throws at us and we didn't allow for that to happen. So here is my bit of progress on my FMQ project.
I skipped the tiny stippling exercise because I quilted that heart design on a quilt which I feel the small stippling would not work with the other blocks. Besides, I have tiny stippled on other quilts. Second, I haven't gotten to the sharp stippling because of that Life I mentioned earlier, but I have been doing some FMQ.
On my last preemie quilt I decided to do some grid quilting but use wavy lines instead of the regular straight lines. I've discovered since my straight lines sometimes are wavy, might as well make them wavy intentionally - LOL.

 I marked it with my 24 inch ruler and my chalk writer. Then I decided to try a leaf design in the center of the churn dash blocks. This was totally FMQ and with each one got a little better. Then I buried the threads as Leah demonstrated.


 What do you think? I'm thinking it's getting easier to do this with each practice piece, so I better keep at it. Now to schedule time to the the sharp stippling.
I skipped the tiny stippling exercise because I quilted that heart design on a quilt which I feel the small stippling would not work with the other blocks. Besides, I have tiny stippled on other quilts. Second, I haven't gotten to the sharp stippling because of that Life I mentioned earlier, but I have been doing some FMQ.
On my last preemie quilt I decided to do some grid quilting but use wavy lines instead of the regular straight lines. I've discovered since my straight lines sometimes are wavy, might as well make them wavy intentionally - LOL.


WIP Wednesday 2/15/12
I'm helping my mom finish a T- Shirt quilt for my DDIL. And I realized that it is perfect to practice my FMQ. So, here is where I'll practice those lessons that my two yearly projects require of me. It measures 71 by 84 and is 20 large squares made from T-Shirts she's worn at her employers. This is the largest quilt I have tried to make with my DSM and not be a QAYG. I'm working on the central blocks right now so that then I can do the outside edge blocks. 3 done - 17 to go!
 I'm linking over at Esther's WIPs on Wednesdays (on my sidebar). Go on over for a look-see!

Fabric Tuesday 1/31/12

And here is a photo with a closer look:
 Go to my sidebar and click on Leah's FMQ project and Quilt Story's Fabric Tuesday. Happy stippling or straight line stitching!
FMQ Project #1 Done
 At Leah's Free Motion Quilting project we were to practice stippling. I decided to stipple a changing table pad I found at a thrift store. It looked like the creator never got around to quilting it and when I washed it the batting started to move around. I straightened it out and set aside to quilt. Here is the back side - the quilting shows up better. I chalked a rectangle in the center of the pad and then stippled using the line as my base. Then I went around the edge about an inch away from the edge. Took me only about 12 minutes to do the whole 17" by 37" pad! The best thing I learned
  from Leah is to leave my feed dogs up and set the stitch length to zero - this worked great on my Bernina to eliminate any thread problems (I had a lot of them before). This one tip is a life saver! Thank you, Leah!
Go over to my sidebar and click on the FMQ project button. You'll be impressed by the practice pieces posted. I am.
Subscribe to:
Posts (Atom)
June's Blog Post
I didn't mean for a quarter to pass by before I posted again, but that's what happened! Let see if I can summarize all that I been...

-
 Yesterday was a tad difficult. Not only did I have the fun of having both boys here, but my TMJ and allergies were acting up, it got to...
 -
 First off, I want to thank all my followers and readers for helping me get to here on Blogland. I so am so grateful for your advice, pra...