Design Wall Monday 2/28/11

Made a few more siggie blocks, and now that I've gotten done with Schedule C - Yaaaay! - may get back to the quilt-along too. So here's what my wall looks like:
They're not sewn together yet.  I have 6 more sets of 4s to sew together. I get 6 units out of each set.

What's on your design wall?  Go on over the Judy's and see what others are up to.  Thanks, Judy for giving us the incentive to keep on working.

Stash Report 2/27/11

Another secret block made, so there's an 1/8 of a yard and some more siggie blocks for another 1/4 yd.  About 1/2 yd went to the donation box for squares for charity quilts, so I used a grand total of 7/8th yard.

None bought - too busy this week to even think about buy fabric even though I went to Jo-An's on wednesday.  But I just bought buttons and thread.  It's going to be easier to not buy as my closest Jo-Ann's is now 16 miles away, and not in the way I do errands either.

Used/Donated this week: ..88 yards
Used/Donated Yr to date: 12.6 yards
Added this wk: 0.0 yards
Total Yr to date Added: -3.5 yards
-------------------------------------------
Total Yr to date Used 9.1 yards.

Over at PatchworkTimes, Judy has posted the state of her stash and let others do so also. Check it out.

My Mug Rug - a Friday Favorite

I have a mug rug - I didn't know that! In that box I was going through I discovered that my forward thinking daughter, made a mug rug 8 years ago, 2003.  How's that for being ahead of the curve? She crossstitched the flower.  I am going to clear a space on my desk to put it and enjoy it.  Thank you, Em, once again.  You know how much I like flowers.  It's amazing what one finds in those destashing boxes.


PS:  that's  my favorite mug too - not for the size but the saying.
PPS:  What's your friday favorite. Let us know at Shay's Quilting in my Pajamas where she hosts favorite things friday

Thursday progress 2/25/11

 This doesn't look like much, but it really was a big deal for me.  This is one box that is now empty.  Yay!  I'm still working on the tax form and wanted to be sure no little slip of paper (translate to receipt) had somehow wound up in this box that was in the computer room.  Came out to be filled with mostly quilty stuff like batting, a couple of patterns, and a big batch of Australian Patchwork & Quilting mags plus a couple of books.  I'm pleased to announce I put those in their places, decided to toss half the mags, put the batting in the batting pile, patterns in the pattern place and now have an empty box to next put things that are going away, away, away! Destashing happened. Back to schedule C!

Three Free Books left

Have 3 books left of my free books (for the cost of postage).  Click on tab Free Books above and send me an email or leave a post.

Design Wall Monday 2/21/11

They've asked me to make a siggie quilt for a professor.  Here is the first block I've made.  I haven't sewn the units together because I may make it more scrappy and will have to mix the 48 units.
They'll be signing on the white and tan strips.  Block is 12" square finished.  Quilt will come out to about 51" square.  I designed it with EQ4.

What's on your design wall?  Go over to the left sidebar and click on patchworktimes.com and see what Judy has on her wall plus all of the other players. 

Stash report 2/20/11

Was busy all week with fabric, but not anything to report about.  Finished another secret block, but it only took about 1/8 yard of pieces from my stash so the numbers haven't changed much.  At least I didn't add to the pile!
Used/Donated this week: .13 yards

Used/Donated Yr to date: 11.72 yards
Added this wk: 0.0 yards
Total Yr to date Added: -3.5 yards
-------------------------------------------
Total Yr to date Used 8.37 yards.
Over at PatchworkTimes, Judy has posted the state of her stash and let others also do so. Check it out.

A Bump in the Road.

There has been a bump in the road to moving forward in the Quilt-Along.  DH wants the federal tax info by Mar 1 so I'm going to have to set the next step on the back burner while I get that Schedule C done.  Hope sooner than later. For those who may need to get their QAYG done now, adding borders is the same as adding a row, but I add all four before I quilt them.  It's easy as they are on the edge.  Then I bind by cutting off the excess batting and bringing the backing forward and folding in half and sewing it down as the binding.  Pictures to come.

In the meantime - I won the blocks at our Guild for the Scrappy Orphan Posie Block!  Now I have 13 of them to play with - another UFO!  LOL.

Design Wall Monday 2/14/11

Have a few more of my strips blocks added to my wall.  The boat is reminding me of the Greek boats when I went on an island cruise of the Greek Isles in 94.  And the strip blocks around it too remind me of the tiles I would see on walls in Constantinople.  Have 4 blocks to go.  It will be 24" square at that point.  I'll add a border of the same material surrounding the boat and then 3" blocks around to make it 34" square when done.  A different kind of baby quilt.

Happy Valentine's Day!

Wishing you a wonderful Valentine's Day with those you love.

Stash Report 2/13/11

I actually shopped this week - on Monday - and bought some fabric:  2 yards of solids for my secret blocks, 1 yard of prints for my secret blocks, and 1.5 yards for the back of a charity quilt.  I did use some of it - phew.  It's not just like I was using it to bolster my stash - lol. And from my stash I actually pulled some out and used it for charity quilts, so here are my numbers.

Used/Donated this week: 3.5 yards
Used/Donated Yr to date: 11.59 yards
Added this wk: - 2.25 yards  (not counting the 1.5 for CQs and adding back .25 left over from backing)
Total Yr to date Added: -3.5 yards
-------------------------------------------
Total Yr to date Used    8.34 yards.

Over at PatchworkTimes, Judy has posted the state of her stash and let others also do so. Check it out.

Quilt-Along Step 4

Step 4:
   1.  Take row D and measure its length.  Mine was 30 1/2" long.  My row C is now 30 1/4" long due to the quilting - Remember when I measured it in step 2 and it was 30 1/2" long?  I'll be able to stretch row C (I'll pull on the bottom a little in whatever square needs it.) the quarter inch to make the seams intersect and the vertical rows to match.  Here is the new row next to the one I've quilted"
2.  Put the new row wrong side up on your quilted row. Check that the seams on the row you are adding are pressed the opposite of the first row.  Match the seams and pin.  Roll up the quilt on the right side as before.
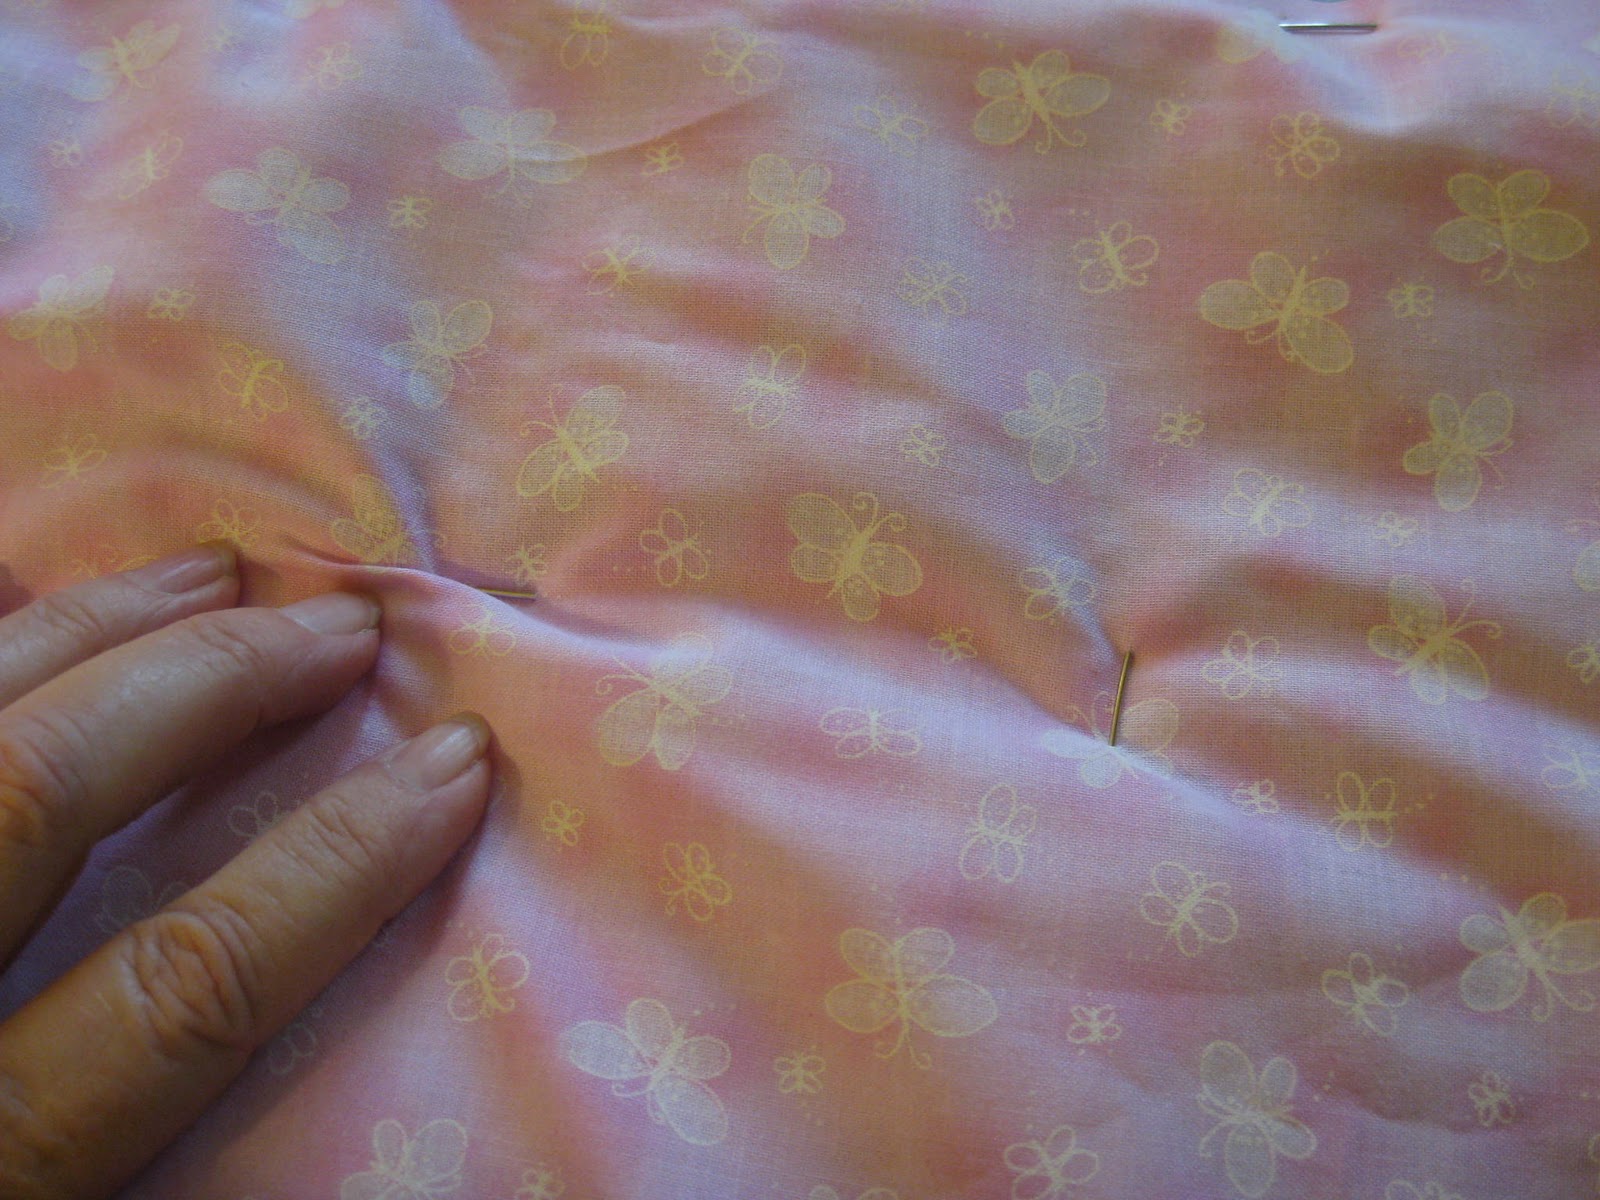
Note: Here is a photo of how I fold the quilt in an accordian pleat (the part that would be on my lap) to make machine quilting easier.  It is weight that makes it difficult to quilt, so try to keep it level on your lap and left side.  Hanging over the sides makes it harder to quilt evenly.
3.  Starting at the top, and using a walking foot, position your quilt to start stitching after bringing the bobbin thread up to the top of the quilt.  Sew your seam with a steady speed - remember the walking foot is doing the pushing, not you.
Here is my added second row smoothed over the batting.
4.  Next we pin baste the row before quilting.  Lay the quilt with the new row on your left( if you're right handed). Gently pull the two layers away from the seam you just made and pin the row down:

This will keep wrinkles from forming when you quilt it. Once you've pinned it turn it over and run your hand over where you will quilt. Photo below shows you a wrinkle I found on the back.


I remove the pin, smooth out the area and reset the pin.  You might have to do a few of these.  And when you turn it over, check the front also that it's smooth.   Quilt your added row as before.  You now have the technique in full.  You can do all the remaining rows in the same fashion, just flip the quilt when you are done with the right side, and do the rows on the left starting your seams at the bottom of the vertical row.  This keeps the bulkiness of the quilt to your right.  I'll post again next Thursday with the borders and to give you time to do your rows.  But you can email me any questions whenever you like.  See you then.

Yard Sale Find

Hi, sorry, sick with a cold and my post on the quil-along will have to wait.  That comes of having such an intense thursday.  I've started a sewing circle at our church - St. Ann's Sewdality.  Our first meeting was yesterday and 7 lovely ladies showed up with enthusiasm and plenty of ideas.  We pray and make quilts, blankets or afghans for those in need in the community or our parish.  And our first quilt is going to a parishoner who is undergoing surgery.  Our patroness is St. Ann, the mother of Mary, the Mother of Jesus.  She is the patroness of Christian families and among other things, seamstresses.  Note: we ask for intercessions (just as a child would ask its mother for help in getting dad to agree to something) not worship a saint since Catholics believe the saints in heaven will help us.
    They were enthusiastic about tying quilts and getting them done fast and of the 8 of us - only 2 do not have sewing machines. We range in ages from 20 somethings to 80 somethings. One will hand piece and the other will assemble kits from squares and strips cut by others.  Our second quilt is one I am donating.  I found this quilt at a yard sale.  Here it is:


I bought it at the yard sale for $2.00 and it looks like brand new.  I know some mom and baby are going to love it.  Okay exhausted my energy - off for some tea and then a nap.

Step #3 of Quilt-Along

For Step #3 we'll begin with our 38" square of backing fabric.  Iron it nicely, fold in half and iron the crease at the outer edge.  Do this for both sides.  We'll use these small creases to mark the halves of our quilts.   Now I laid the back on my carpet with wrong side up.  Next I placed my 38" square of batting on top of it.  Now I went around the edges with safety pins and pulled the back tight through the batting by sticking the pins into my carpet pad.  If you use a table to sandwich, you can use double sided masking tape about an 1" from the edges of the backing to make it somewhat tight. This is an important step to reduce pleating of your back when you are quilting.

Our quilt has 5 vertical rows of blocks.  Take the middle vertical row (C in my case) and measure it.  Mine is 30 1/2".  Make a note of yours. I centered the row on my sandwich 3 3/4" from the top and bottom and    15 1/4" from side to side.  If you are using 3 rows, use row #2.  If an even number of rows, email me. See photo below. 
You can see the pins on the edges. We left room for the border all around. Now pin your row at the corners,  along the seams and in the center of the block. Once that is done, I take out the pins and pin them all around the edges of the quilt to stabilize the sandwich.  Turn the sandwich over and run your hand on the pinned back to see it if is smooth.

Take your sandwich to your sewing machine.  When I quilt, I use the same thread in top and bobbin, a Microtex 75/11 needle, feed dogs down, a single needle plate, and a open darning foot. I am going to do a large meander over the row staying about 1/2" away from all the edges.  Don't worry - as you add more rows and quilt, you can fill in spaces that may look empty.  This is to anchor your sandwich and get the hardest part of the quilt quilted.

You could also use a foot with a plastic foot. Note:  If you've never quilted on your machine, stop and make a 12" square sandwich to practice.  Pin your sandwich around the edges and one safety pin in the center.  Set up your machine.  Bring your bobbin thread to the top of your sandwich and take a couple of tiny stitches to anchor the threads.  Now with your hands on both sides of the foot - start to sew and use your hands to guide the sandwich going at a steady speed.  When you start to do a curve, slow down a bit so you won't get big stitches.  There are a lot of good how to machine quilt books out there.  I started by quilting small charity quilts and haven't looked back. Hey I've still got a lot to learn, but with the practice, they are starting to look better and better.  That's all it takes - practice.  Here's a site to see a machine quilter in action:  http://www.daystyledesigns.com/stippling.htm

Or you might like to do straight line quilting.  I do all the above but use my walking foot and guide.  See below:
This will give me straight row quilting.  By lining up the guide 1/4:  from the edge I get a straight lines through  all the blocks evenly spaced. Reverse the guide for the other side of the blocks. If you use the edge of the blocks you'll have a nice pattern of spaced lines. Whatever you want to do.  With this method all you need to do is two lines and you're done with the row.

Roll up your quilt on the right side of your row of blocks and place it under the needle.  Bring your bobbin thread up to the top, and take a few tiny stitches to anchor your threads.  Meander at a steady speed over your block leaving a 1/2" free of quilting on all the edges and guiding the row with your hands.  Here is my completed first row - took about 10 minutes.  Ps:  I put the tape from the top and bottom blocks of the row and stuck them to the batting to remind me which end was up.

That's it for this step.  If you have questions, please email me.  See you friday - Thursday is going to be way buzy for me. 
 

Design Wall Monday 2/7/11

New block up on my wall. This is from Quiltmaker and is the Project Linus block for this year. I made one and that will be it for me. Paper piecing is a bit of challenge. And I'm going to do more of it, but not of this little sailboat. My frustration was getting the sky to look like sky - my fault for picking a directional print. I'm going to use it as a medallion in another charity quilt. And I'm adding some crumb blocks around it - LOL, not the the usual baby quilt, but I'll use a novelty flannel on the back.  In skimming quilt history books, I've seen a lot of crib quilts with eagles, Baltimore album blocks, pomegranites, etc on them.  This baby is getting a more unusual one, too.

What do you think?  Will mama use it as a wall hanging?  I'm wondering.

Stash Report 2/6/11

Have found the back to the first quilt to tie, so that means another 1.25 yards used. The binding is part of that total because I'm going to bring up the back and use it for the binding. Made some crumb blocks and used another 1/8th of a yard.

My numbers are:

Used/Donated this week: 1.37yards
Used/Donated Yr to date: 8.09yards
Added this wk: - 0.0 yards
Total Yr to date Added: -1.25 yards
-------------------------------------------
Total Yr to date Used 6.84yards

Over at PatchworkTimes, Judy has posted the state of her stash. Check it out.

Ready for Step #2 of our Quilt-Along?

Ready for Step 2?  You'll find that below.  And for those of you who want to make a smaller quilt, I've added some additional info at the tab "Quilt-Along. 

Step 2:

Here is a photo of my choices:


Once I have my layout, I take masking tape and mark each square with a row and number. This way I keep them in order when I go to sew them.
Here's a sample of row 4: 
 
Yes I moved one block after the first picture! Photos do that to me - they make me see the value of color.

Then I pin one row together so that I can work on one row at a time.


Now you can go sew your blocks into vertical rows. But don't sew the rows together into a top. Here's where this method starts to differ from the conventional quilt process. More on Monday.

I'd love to see your choices.

SAHRR Round 5 and 6

  Ready to show rounds 5 and 6. Actually, the prompt for 5 was make 4 of something. So I chose four patch, and actually since that made my q...