DWM 4/30/12

The quilts on last week's design wall monday are still there, however I'm binding one and sandwiching the other.  I need to get these done by the 10th.  I quilted this one with a squiggly line instead of stitch in the ditch.  The packaging for the batting recommends that it be not quilted more than 4 inches apart.  Since these are 7 inch squares, we are going to tie them in the middle and they should be fine.

I'm linking this to Judy's Patchwork Times (on sidebar) and while I'm there I'll check out what others are doing.  You're invited, too.

Stash Report 4/29/12 & FMQ Challenge

Started a landscape and used .25 yards, started my last Jubilee block for another .13 yards, made a charity top for the St. Anne's group using 1.03 yards, and bound one of the teenager's quilts for another .21 yards.  Here are my numbers:
Used/Donated this week: 1.67 yards
Used/Donated YTD:      59.23 yards
Added/Bought this week: 0.00 yards
Added/Bought YTD:      21.5 yards
------------------------------
Net Decrease YTD:       37.73  yards

I'm linking to Judy's Patchwork Times - see what progress has been made there on destashing. Button on sidebar.

And now for my FMQ Challenge.  I have to post this today as tomorrow will be busy.  One has to complete and post the FMQ project for the month before that month ends, so here goes.  Our teacher this time is Don Linn.  He does fabulous work.  His method for marking designs uses tulle, a hoop and pens with water soluble ink. The good thing about his method is you can make your own designs easily and enlarge them easily too!  I like that.  But I don't have tulle or hoop and I'm trying not to go to a quilt store or Jo-Ann's so I had to make do with freezer paper again.
 I made an extra copy of the pattern and cut it out for the outline. Then taking the intact copy, I traced it onto a square of freezer paper and cut out the pattern.  You can see that I clipped the lines in the leaves and other parts leaving just a little bit attached so that I would have the least amount of paper to tear away.
 I've positioned the outline paper on the sandwiched block.  This block is part of a large quilt already sandwiched and some of the blocks are already quilted.  I should have traced the block onto freezer paper.  That way I could have ironed this in place and I wouldn't have to worry about it moving.
 Next, I laid the cut pattern in  the outline area.  Again, I learned that I should have numbered the leaves so that they would be easier to match.
 Once in position (sort of), I started to iron down the pattern to the block.
 Here it is with the outline copy removed and all ironed down.
 Following Don's excellent order of sewing directions, I quilted the design.  It was a snap to remove the paper as there were so many places where I quilted next to the paper, not on it.  See a couple of dark sewing lines? That's where I sewed on the paper, right where the pencil line was and the lead transferred to the cloth - darn!
 Okay, this is a big block.  How was I going to fill it?  Decided to try free motion echo quilting.
And here is my finished block.  I'm linking this post to the FMQ Challenge 2012.  You'll find that button on my sidebar also. Now off to start back basting my Jubilee album block.  What are you up to?

I'm behind!

I'm behind on some of my projects, but I bet I'm not the only one.  One of the factors in getting there, is what Life throws at us and we didn't allow for that to happen.  So here is my bit of progress on my FMQ project.

I skipped the tiny stippling exercise because I quilted that heart design on a quilt which I feel the small stippling would not work with the other blocks. Besides, I have tiny stippled on other quilts. Second, I haven't gotten to the sharp stippling because of that Life I mentioned earlier, but I have been doing some FMQ.

On my last preemie quilt I decided to do some grid quilting but use wavy lines instead of the regular straight lines.  I've discovered since my straight lines sometimes are wavy, might as well make them wavy intentionally - LOL.
 I marked it with my 24 inch ruler and my chalk writer.  Then I decided to try a leaf design in the center of the churn dash blocks. This was totally FMQ and with each one got a little better.  Then I buried the threads as Leah demonstrated. 


What do you think?  I'm thinking it's getting easier to do this with each practice piece, so I better keep at it.  Now to schedule time to the the sharp stippling.

Favorite Things Friday

 You're probably tired of my flowers, but I can't help it - in the summer I won't have any to show you - at least not of the annual kind. Here are the primrose in their full glory. The pink is so intense.  And so profuse!


I can't get enough of them!
Here's a closeup.  They would make a wonderful O'Keefe type quilt wall hanging.  Sadly in a plant sense, we had a heavy rain during the night and most of them are flattened, bu I have the  pictures!  Go on over to Shay's Favorite Things Friday.  Go to my sidebar so you can enjoy other's favorite things.

Applique Thursday 4/26/12

Life has been busy and it's so easy to get bogged down with other things that keep saying me next, me next. That's why I'm really glad for Applique Thursday because it gets me back to my favorite type of quilting.  This morning,  I pulled out the background and cut another square, found the magazine, am making copies and will soon begin transferring the design to the back of the square so I can begin back basting my fourth Jubilee Album block.  Too soon I'll have to move on to meetings, housework, bank errand and ??? will come up.

What are you sewing, quilting, knitting, etc?  Sure could use some eye candy of any kind at this time. Thanks!

Fabric Tuesday/Wip Wednesday

Yesterday was a fun day.  I got to spend 4 1/2 hours with my friend, Bette, doing a workshop at her house! We were working on a Karen Eckmeier's Accidental Landscapes project.  Bette is ahead of me by two projects and is working on her third, so she was able to guide me as to what I was doing.  She's a great teacher. Here's what my book looks like.  

So I started on the practice piece Karen recommends one do before starting on a project.  Here's what fabrics I picked to start with:
 This took a loooooooooooong time to decide what to include. Phew - it took us all the way to lunch time.  Then one has to decide what silhouette your going to use for each piece.  Since this was my first attempt - that took a long time, too, So I decided to generally follow what Karen had done in her practice piece.  I found that amazingly the landscape shapes will be pretty much determined by that first cut. 
Who would have known?


So after much dithering and checking values with a red disk, here's what we came up with:


Mind you this is just laid down right now on a design board.  And I'm thinking the lake has to be smaller so that the mountains don't seem to be floating. Aye de mi!  Off to dither some more.

Since I was tied up most of the day yesterday, I'm posting this as a fabric Tuesday, Linky Tuesday, and a new WIP post today. Go on over to my sidebar and visit those blogs to see what others are up to.


Design Wall Monday 4/23/12

Working on two St. Anne's quilts for a family where the single mom with 4 kids (16, 15, 4 and 5)  has stage 4 cancer.  We are making all of them a quilt even dear grandson who is only 2 months.  Have 4 done; working on the last two for the teenage girls. They are tube quilts and went together fast.  By opening the tubes at different seams, they look different, but similar.  What do you think?
 What's on your design wall?  Go on over to Judy's Patchwork Times and see what eye candy people are working on. (sidebar).

Stash Report 4/22/12

It was a good week for destashing - at least for my goals that is.  I have pulled 4 1/4 yards for two charity quilt backs I have started.  I made a quiltlet (.22 yd )and finished a mug rug (.04 yd).  Now you're probably wondering how I got those numbers in parentheses.  And I have a friend who wants to know how I figure yardage using scraps so here goes.  When I've finished a project [let's use the mug rug as the example] I measure my piece - in this case it was only the backing that I pulled from my stash.  It measured 7.5 inches square.  Now I found how many square inches there are in a yard (using 36 x 42 measurement).  There are 1512 square inches in this yard.  I'm going to use that as my standard yard.  So I multiplied my mug rug backing  7.5 x 7.5 and got 56.25 sq inches.  I divide that by the 1512 and get 0.0372 or 0.04 of a yd.  That quiltlet that I made - it was 18" square.  Doubled the 18 and divided by 1512 to get .22 yds.  Clear as mud?

When I'm making a scrap block, I lay out my scraps and work out how many inches I took out of my stash.  The little I have left is usually too small to go back into the scrap bin (it's not going back into my stash!), so it isn't added back. Take the photo above.  I laid out my scraps and I would roughly be using a rectangle of fabric that measures 11 x 14 or 154 square inches or .10 yd.

Why do I bother - Hey!  Progress is progress  - no matter how tiny a destash - LOL.  Here are my numbers:
Used/Donated this week: 4.51 yards
Used/Donated YTD:      57.56 yards
Added/Bought this week: 0.00 yards
Added/Bought YTD:        21.5 yards
------------------------------
Net Decrease YTD:         36.06 yards

How are you doing on your destashing? Go on over to Judy's Patchwork Times and see how others are doing.

Favorite Things Friday 4/20/12

One of my favorite things is sharing.  And today I'm sharing two things.  The first is another photo from my kitchen garden.  The roses are glorious and the fragrance (!) - wish you were here to enjoy it with me.  Next to the roses is our pomolo tree which is in full flower -that and the roses makes me think I am in a perfumery.
Secondly, thought you'd like to see what Robin is getting from the giveaway last week.  I had mentioned two books, some fabric, a notion and maybe a finished project.  So here they are.  Each book features a technique I dearly like.  Raw edge applique is so forgiving - I really recommend it if you've always wanted to try applique.  The next book is one where I learned some tricks on doing Quilts as You Go.  Makes finishing quilts so much faster.  The fabric, of course, is from my stash, and in some of my favorite colors.  I hope you like them too, Robin.  The notion is a cute little tin with a measuring tape in it.  Good for your purse, Robin.  And lastly, I finished off my demo applique piece of a few posts ago into a mug rug.  Enjoy, Robin. The box is going in the mail today. And thanks to all who played.  I'll be having another giveaway in May.  Hope you play then, too.
I'm linking this to Shay's Favorite Things Friday.  Go over and see what others are sharing. I'm off for my morning walk.  Happy Friday!

Applique Thursday 4/19/12

I was sorting through a box and came across this:


The label says it's from Lahaina, but I remember I bought it in Molokai when we went there on an Elderhostel trip (excuse me, they're called Road Scholar adventures now).  It was a great trip.  In one of the excusions to a distillery, I bought this kit which is very thorough - even had thread and needle.   
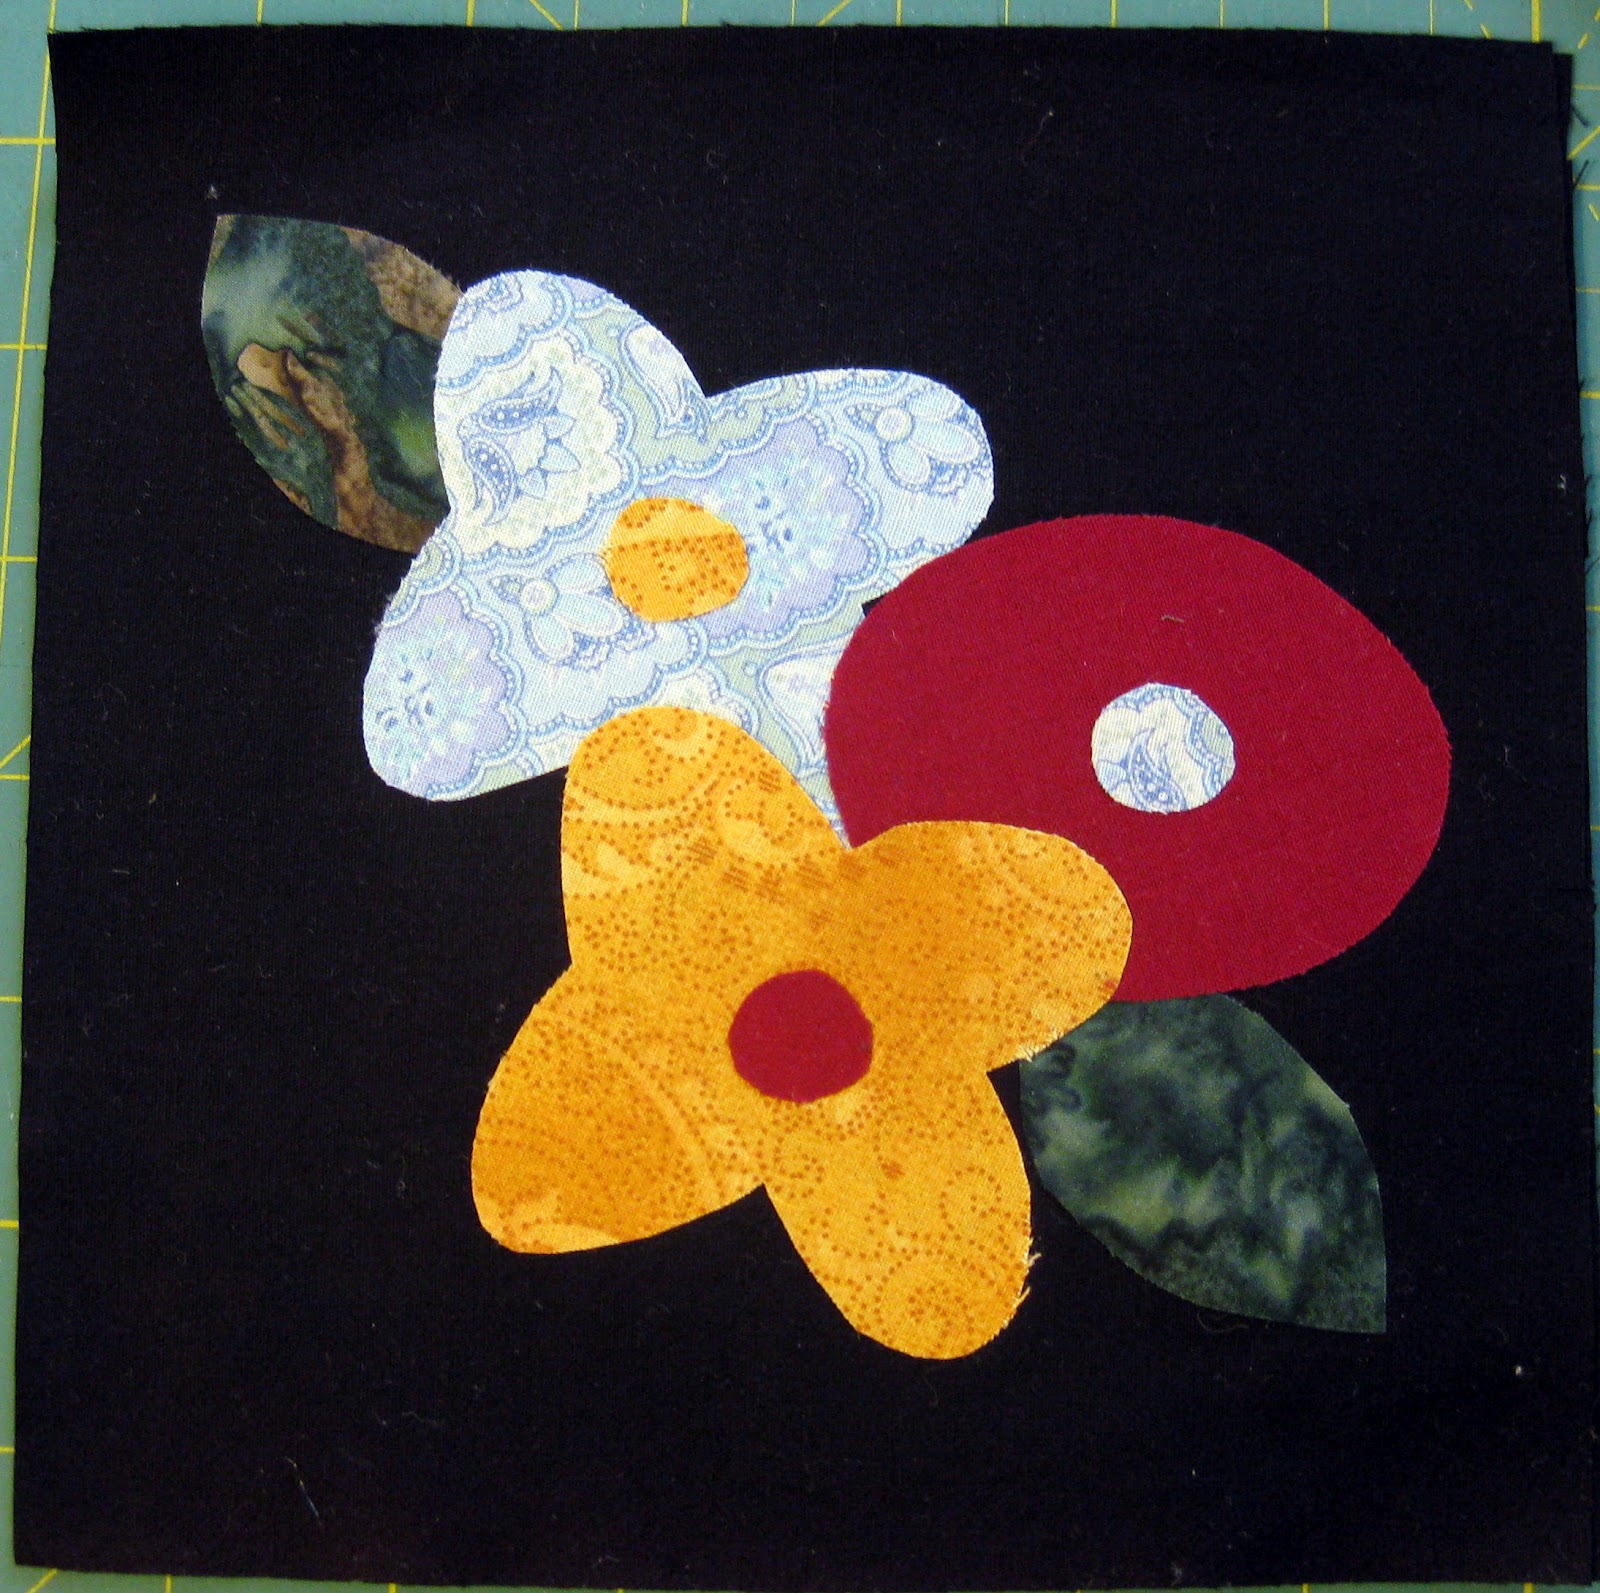
Since it's about 6 years old, I'm going to try and finish it by doing a little at a time.  In other words not bury it for another 6 years.  I'm finding I'm not very good at needleturn - I can't seem to get the seam allowance even.  Maybe by just doing more I can correct that.  But then this was way before I learned back basting.  Now with that I've had more success.  Off to work on it.
 
What are you working on - applique or otherwise??  Please link below so we can all see your eye candy.
Thanks ever so much!

Giveaway Winner

Thank you all for entering my giveaway! You had some interesting guesses. I'd see a guess and look at the photo and, by golly, I could see where you were coming from for the most part - amazing! Oh, the power of suggestion.

The answer: a maze! I was so happy to see quite a few of you pick that as your answer as I was hoping I got it right when I was designing it. I've decided my Craftsy quilt is going to have a demonstration garden theme and a garden maze is part of that.

And the lucky winner of those who sent in Maze as their answer is
Robin! She said...
Congrats .............. I would like you to know I am a follower. Your block for April makes me think of a garden maze.

Please get back to me Robin with your snail mail address, and I'll send your package out to you.  I'll post a photo soon once I've rounded up all that will go in the box.

Again, thanks again for playing and welcome to all the new followers.

WIP Wednesday 4/18/12

I'm putting together a carpenter's star to have ready when Judy at Patchwork Times (see sidebar) has her feather quilting demo.  Another opportunity to learn more/practice free motion quilting.  I've minimized it as I didn't want a huge project - this will be about 32" square - her's more like 48 x60.

I'm linking this to Esther's WIP Wednesday.  you can see the button on my sidebar.  What are you working on today?

Design Wall Monday 4/16/12

Here is a new project I started yesterday.  I can't show you much as it is a surprise for an online sister of a group I belong to.  It's not only a new project, but a new technique too.  Should be interesting.  It involves curves, but only straight stitching.  Oh, yes and a new notion - a ruler to be exact.  And yes, it is Christmas fabrics.

It's not to late to participate in my giveaway.  Ends Wednesday evening.  Click here to guess.

So what's on your design wall? I'm linking to Judy's Patchwork Times and Lynn's BOMs Away - both buttons on sidebar.  Go on over and see what everyone is doing, and add your linky so we can see what you are doing, too.

Stash Report 4/15/12

Here come the Roses - lots of blooms with this very cool weather for April - Yeah!
I made three blocks and used a half yard of fabric.  I sorted through my stash and found 3.75 yards I can give to St. Anne's for more baby quilts.  Here are my numbers:
Used/Donated this week: 4.25 yards
Used/Donated YTD: 53.05 yards
Added/Bought this week: 0.00 yards
Added/Bought YTD: 21.5 yards
--------------------------------
View from my kitchen window.
Net Used YTD: 31.55 yards        

A Giveaway!

Wow - I'm at 495 posts and now have over 300 followers - thank you one and all for sharing my passions. I'm figuring that by next wednesday I'll be at 500 posts and this calls for a giveaway!  How about a couple of books, some fabric, a notion and maybe a finished project.  Interested?  Can't tell you what the specific items will be as this is going to be a mystery box, but it's open to all my readers.  Just be sure if you use anonymous that you include an email for ya so I can reach you to let you know if you won.  I have a question for you below.  Leave a comment to answer that question and you'll be entered.  If you are a follower, tell me so, and you can guess twice.  If no one guesses the answer, I'll do a random draw of all guesses made.  If more than one guess correctly, I'll do a drawing of just them.  The only thing I'm saying is that the answer is not a "number" - LOL - that's what my husband guessed.
Okay here goes:

Here's is my latest Craftsy Block of the Month.  It is for the month of April.  Amy challenged us to come up with a design using hexagons.  I came up with an idea and decided to execute it in extended hexagons. So, your question is:  What was Angie trying to depict in her block?  This giveaway ends Wednesday, April 18 at 6 PM so I can post a winner on Applique Thursday.  Good luck!

Applique Thursday 4/11/12 - My First Mystery Block

Not completely done - still have some thread work [using a varigated thread and tiny zig-zag around the edges] to do on the other leaf, the corn flowers and the sunflowers (but I don't know what to do on that yet - and I'm still waiting for a 50% off coupon at Michaels to get my pencils). Also have to add the name plate.The white border around the block is to show what I think will be the inner border as that was what Esther had on the pattern, but this is a mystery, so hmmm.  I've never done a block with so many pieces, but going one by one, methodically, with teflon sheet and pins, small iron and working in units of 3 pieces or more at a time{you can see one such unit at my post of the 9th}, it's coming together.  Thank you so much for this pattern, Esther.  You can still join in - her Forget Me Not button is on my sidebar. And the pattern will be free up to the 15th of this month when we get our next blocks.

Would love to see what you're working on, applique or not. Please add your link at the blue button below.

Design Wall Monday 4/9/12

Here's the flimsy I made last week.  I used some churn dash swap blocks from way back when and a baby print instead of a solid square between blocks. 

Also on my wall is that sunflower block I am working on.  I'm constructing the flower in parts because of its complexity.  It isn't hard - just have to be methodical and do it piece by piece.


I'm linking to Judy's Patchwork Times, Lynn's BOMs Away Monday, and  Manic Monday Linky Party. What's on your design wall?

Stash Report 4/8/12 and Spring Trio

Had a wonderful Easter Sunday.  Hope you did too.  Food was good, company was great.  Praise the Lord for His abundant love for us.

I've been working on the mystery block for Esther's BOM, so haven't done much sewing.  Oops I take that back - I did make a charity flimsey with some swap blocks but that was way at the beginning of last week - think tues.  It's been so long since I've sat down at the machine as I was dealing with all the tiny pieces for the applique block.  I'll show it tomorrow.  The light is not good for taking a photo.  In the meantime here is a shot from my garden.  White allysum, pink primrose and yellow Iris.  They look so pretty together.  The iris has given me 12 blooms from two stalks.  It took 3 years before it bloom but wow, I love it.   So  a charity flimsey for 1.5 yards; pieces for applique about 1/4 yard and 3 yards for charity giveaway.  Here are my numbers:
Used/Donated this week: 4.75yards
Used/Donated YTD:      48.78 yards
Added/Bought this week: 0.00 yards
Added/Bought YTD:      21.5 yards
--------------------------------
Net Used YTD:            27.28 yards

How are you doing?  Go on over to Judy's Patchwork Times on my sidebar to see how others are doing.

Favorite Things Friday

I'm actually posting this on Saturday as Friday is spent in mourning and sorrow for our Lord.  And tonight we go to keep vigil as we move into Glorious Easter.


I finished that pillow for Alan.  I made it envelope style and it went together pretty good with just half yard of fleece.  And he happened to come over Wednesday, so I gave it to him then.


For Me?
 He started to play with it right away
 He'd throw himself on it and give it a hug
Yeah, I like my owly pillow!

I was touched by his display.  Pillow now resides in his crib.

I'm linking to Shay's Favorite Things Friday - go see what others are sharing.  Button on sidebar.

Applique Thursday 4/5/12

A group I belong to has been discussing what markers to use to mark the background for needleturn applique (Esther's new BOM, button on sidebar).  I realized I had never learned that method.  I recently found another at Kay MacKenzie's blog, All About Applique, called back basting.  She has a tutorial here .  It's a pretty cool method and I've been using it on my Jubilee Album blocks (which I should get back to).  However, the method I used with good success before and I still go back to is one I learned partly from a Sulky Thread instructor at a Road 2 Califonia workshop and mostly at a Zena Thorpe workshop.  Here's how it goes:
First I make an outline of the template of the applique that I am going to construct.  This one is for a 6 1/2" block from the book Better Homes & Garden Easy-Does-It Quilts.  The quilt is called Cosy Comforter and was designed by Peggy Kotek. I numbered the pieces in the order I have to lay them down from the bottom up.  Well, I used letters this time.  I then make reverse copies of my pieces and iron, cut out and have ready to assemble.
 I then take the outline to my ironing board and lay my teflon sheet over it, and turn on my iron to a non steam setting.
I take off the paper from the fused pieces and lay my A pieces in place.

I keep building the applique by added the next piece (B), and so forth.  Nothing is fused yet.

And I keep doing that til the whole applique is formed.  Now is when I fuse the shape by laying the iron on top of the design for about 3-4 seconds.  You just want to lightly fuse it together.

Now you will be able to gently lift it off your teflon sheet and place it on your background. Here is the back of the unit ready to fuse to the background which is now over the outline of your form. This is what I learned from the Sulky instructor.  And works fine except for dark backgrounds where you can't see your pattern.  Enter Zena Thorpe.


Zena had us make 3 copies of the pattern:  one to cut out to use as our outline, one for the reverse pieces and one for reference.  So here I have placed the cut out outline over my 7" square of black.  I then take my unit of applique and lay it in the outlined space, fuse the unit to the background (8-10 seconds, hot iron, no steam), and remove the paper.

Voilá, my block is done.  I have the makings of a new mug rug.

Would love to see your eye candy, applique or otherwise.  I like seeing your projects.  They inspire and motivate me to think about doing new techniques.  You can link your blog post below.  TIA!

SAHRR Round 5 and 6

  Ready to show rounds 5 and 6. Actually, the prompt for 5 was make 4 of something. So I chose four patch, and actually since that made my q...